
Newbie, intermediate player, seasoned pro or somewhere in between, at some point you’re going to want to change your electric, acoustic or bass guitar strings.
For most guitarists, the process becomes automatic – you could practically do it in your sleep – but we’ve all got to start somewhere. It may be simple, but it’s super important so let’s dive in.
When to change guitar strings
I’ve changed strings simply because I felt like it or wanted to try a new brand but generally there are three reasons that have me reaching for a pack of brand spanking new guitar strings:
Change your guitar strings when:
1. You break one
2. Your old strings are so old they’re gunked up with debris
3. Your old strings sound dull and lifeless
All these are valid reasons. When I started playing guitar back in the day and money was a bit tight, whenever I broke a string, I just used to replace the offending culprit – but generally that’s not good practise.
Tonally, you want all the strings sounding the same. Having one brighter than the others because it’s newer really should be avoided. Just replace the entire set. Guitar strings are cheap enough!
There are a couple of potential exceptions – such as breaking a string mid-gig and you need something to tide you over; or you’ve just bought a new set of strings and break one when you’re putting them on. It happens. Just replace the broken string.
How often?
How often you should change your strings is a ‘how long is a piece of string’ type question – it depends on how regularly you play; the climate where you live (moisture in the air); and frankly how much you sweat when you’re playing.
Breakages aside, if you gig regularly you may want to change them every week. If you’re a pro, probably before every gig. If you just practise a bit at home, change your strings every month or two. You’ll know when the time’s right. Strings lose their zing and just sound dull.
You need to know about string gauges…
Guitar string gauge is all about the thickness of the strings. More specifically when people talk about 10 gauge guitar strings for example, what they’re actually referring to is the thickness of the thin E string. In this case the diameter would be 0.010 inch (or ten thousandths of an inch). 9 gauge would be 0.009 inch. You get the idea.
String gauges tend to follow a pattern in terms of individual string diameters. A set of Ernie Ball nickel Regular Slinkys 10 gauge for example have the following string thicknesses:
0.010” (thin E string)
0.013” (B string)
0.017” (G string)
0.026” (D String)
0.036” (A string)
0.046” (thick E string)
Although guitar strings of a specific gauge mainly follow common string diameters, there are exceptions. Most string manufacturers produce hybrid sets which can be a real mix and match.
As an example here’s the string diameters of a set of D’Addario EXL 110BTs electric guitar strings. Again these are 10 gauge, but there are subtle differences to the Ernie Ball’s above:
0.010” (thin E string)
0.0135” (B string)
0.017” (G string)
0.025” (D String)
0.034” (A string)
0.046” (thick E string)
Did you spot the differences? Slight deviations with the B, D and A strings.There’s no right and wrong here. It’s all subjective and down to personal preference.
Different strokes
The most common string gauges are 9 (light), 10 (regular); 11 (medium); 12 (medium heavy) and 13 (heavy). Remember, these numbers denote the diameter of the thin E string in thousandths of an inch.
Most players tend to stick with a certain gauge of guitar strings that suits their particular style of playing, but the main purpose of using a particular gauge is to ensure that the strings maintain the correct level of tension when they’re in place on the neck.
Shorter scale guitars tend to use thicker gauge strings to maintain that tension. The reverse is true for longer scale guitars. So while it is perfectly OK to change string gauge, bear in mind this may affect the set up of your guitar. Usually, a guitar ships with a certain gauge of strings for good reason.
Your style of playing also directly affects the string gauge you’ll use. If you’re predominantly a rhythm guitar player and not into Steve Vai-esque widdly guitar solos or manic blues bending for example, you may prefer heavier gauge which will give you a thicker tone and stay in tune better – but on the flipside they’ll be harder to play so not the best choice for beginner guitar players.

There are differences between electric guitar and acoustic guitar strings. Generally (but not always) the top three strings (E, A, D) on an electric set are wound, and the bottom three (G, B, E) are unwound. The unwound G string lends itself to easier bending and lead guitar work.
On acoustic sets (again not always) the G string tends to be wound. There’s a reason for this – acoustics are used mainly for strumming and picking and less for lead guitar – so less need to bend that G string!
As a final thought on guitar string gauges: lighter gauges (9s and 10s) are great for beginners as they’re easier to bend and easier to play. On the downside, you’re more likely to break a string and there won’t be as much volume and sustain as heavier gauge strings.
Heavier gauges produce a full tone and more sustain. You won’t break them as often but they do require more finger pressure to play so they’ll be hard work if you’re a beginner. If you’re into drop tunings, heavier guitar strings are your best bet.
If you’re just starting out on an electric guitar, we’d recommend a standard set of 10 gauge guitar strings. They’re ideal for most guitar styles and represent a good middle of the road choice.
On acoustic, we reckon 12 gauge strings are a good starting point. Rich, full tone but not too brutal on the fingertips as you gain experience and harden up those finger pads.
OK let’s get down to business. Time to change your guitar strings.
String materials
Once you start looking at guitar strings in detail you’ll notice that there’s a bewildering amount of choice in terms of materials. This article won’t go into extreme detail about the pros and cons of different materials – there’s literally volumes of that stuff all over the internet. But here’s our top level comments:
Acoustic Guitar
The most common types are 80/20 Bronze and Phosphor Bronze. Probably phosphor bronze is in pole position. The material definitions refer to the winding around the steel core of the string.
80/20 Bronze (80% copper; 20% zinc)
- Loud and bright sounding
- Susceptible to sweaty digits. Lose their high end zing pretty quickly
Phosphor Bronze
- Full, rounded tone. Deep lows, crisp highs and balanced mids
- Slightly darker sounding than 80/20s
- Probably more common than 80/20 Bronze
- Long lasting. Good tone retention
We can’t emphasize this enough: acoustic guitar woods, construction and size not to mention playing styles are unique. Guitar strings are cheap – try out a selection and see what you like best. .
And do try different material types: stainless steel, Monel and coated strings (like Elixirs) all have their pros and cons. I use Elixirs. The string coating promotes longer life, but some guitarists can’t stand them.
And don’t get too hung up on brands. Most guitarists have their favorites but you won’t go far wrong with established brands like Ernie Ball, D’Addario, Martin, Elixir, DR, Dean Markley and Fender.
Our recommendation if you’re just starting out? Get a set of 12 gauge phosphor bronzes. If you’re more experienced, you’ll know what you like anyway!
Electric Guitar
Again, plenty of choice but essentially it comes down to two main choices: nickel plated steel and nickel.
Nickel strings have been around forever. They offer a warm sound with a smooth feel and were the main choice for blues players up until the late 60s.
Today, however, nickel plated steel is the material of choice for most electric players. Balanced sounds in terms of lows, mids and highs and generally they’re louder than their nickel counterparts.
Undecided? Go with the majority and choose nickel plated steel. For starters choose 9 or 10 gauge.
Bass Guitar
Three main material types here: flatwounds, stainless steel roundwounds and nickel roundwounds. Again a variety of gauges are available and choices will be influenced by playing style and the scale of the bass you’re using.
Slappers will favor a lighter scale; jazz players probably heavier. As an example, Rotosound standard gauge Swing Bass strings (from thick E to G) are 0.105, 0.080, 0.065, 0.045 inch.
Flatwounds
THE original bass string material. Derived from upright basses, in the early days of electric bass this was simply all there was.
They’re dark sounding, have a warm vintage like tone and have virtually no fret noise. Extremely easy to play and easy on the fingers – but not very versatile.
Stainless Steel Roundwounds
Very bright and powerful sound but much harsher on the fingers (and your fretboard). Beginners may find stainless roundwounds quite difficult to play, but they sound superb (for most modern styles like slap and tap) and really cut through a mix.
Nickel Roundwounds
Probably the most versatile bass string material. More forgiving than stainless steel and not so brutal on fingers and fretboard. Stainless is brighter, but nickel is a good jack of all trades guitar string material that works for picking and fingerstyle through to slap and tap.
Our recommendation for newbies: Nickel roundwounds. A good versatile choice.
Tool up and change those strings
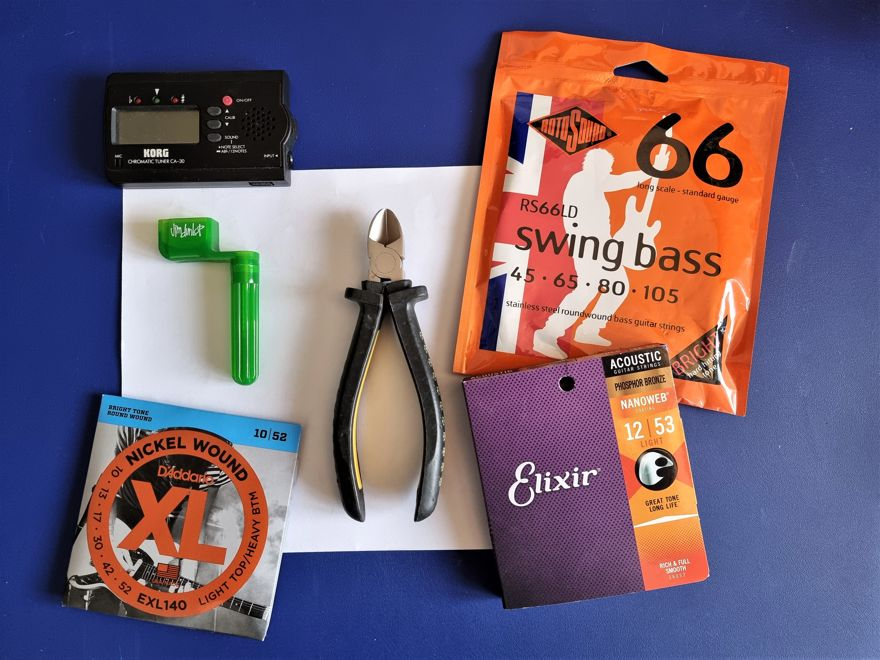
No great surprises here: to change your guitar strings you’ll need a set (obviously), a peg winder (not essential but makes life easier), wire cutters and a tuning device of your choice. Also, not pictured here, but a cloth is handy for cleaning the guitar. Much easier to do with the strings off.
Before we start, get comfortable. If you’re lucky enough to have a bench to lay the guitar on great – but I often change mine via a combination of sitting down with the guitar in an upright position between my ankles and laying it on my lap or a table.
Acoustic Guitars
1. OK, it’s not unusual, when you remove all the strings from an acoustic guitar for the bridge to fall out. Doesn’t always happen because often they’re glued in – but not always.
If it does succumb to gravity and plummet to the floor then you’ll want to put it back the right way round. So just mark the top of the bridge with a piece of tape, pencil or a crayon BEFORE you remove the strings.
2. Acoustic or electric guitar, the first thing we’re going to do is remove the old strings. Now remember the strings are under tension so if you just cut the strings as they are, you’ll probably end up garrotting yourself so slacken them off first before cutting. Use your trusty peg winder for this if you’ve got one but fingers are fine. Make the cut with your wire cutters around the 12th fret
3. Remove the string retaining pins (all six on a six string) by the bridge and remove the strings (they’ll have balls attached).
Sometimes these are a bit difficult to extract. What I do is gently use the blade of the wire cutters to unseat them. Some peg winders have a groove in them specially for this process. Once you’ve done this, remove the string remnants from the headstock end. Just unwind them
4. Dispose of the strings safely
5. Clean the guitar with the cloth – body, fretboard, neck, machine heads and headstock.
6. If you want to clean or treat the fretboard to condition it, now’s a good time to do it. There’s a bamboozling array of products around for this. Personally, we like the Guitar Fingerboard Kit from Jim Dunlop which contains both a cleaner and a conditioner.
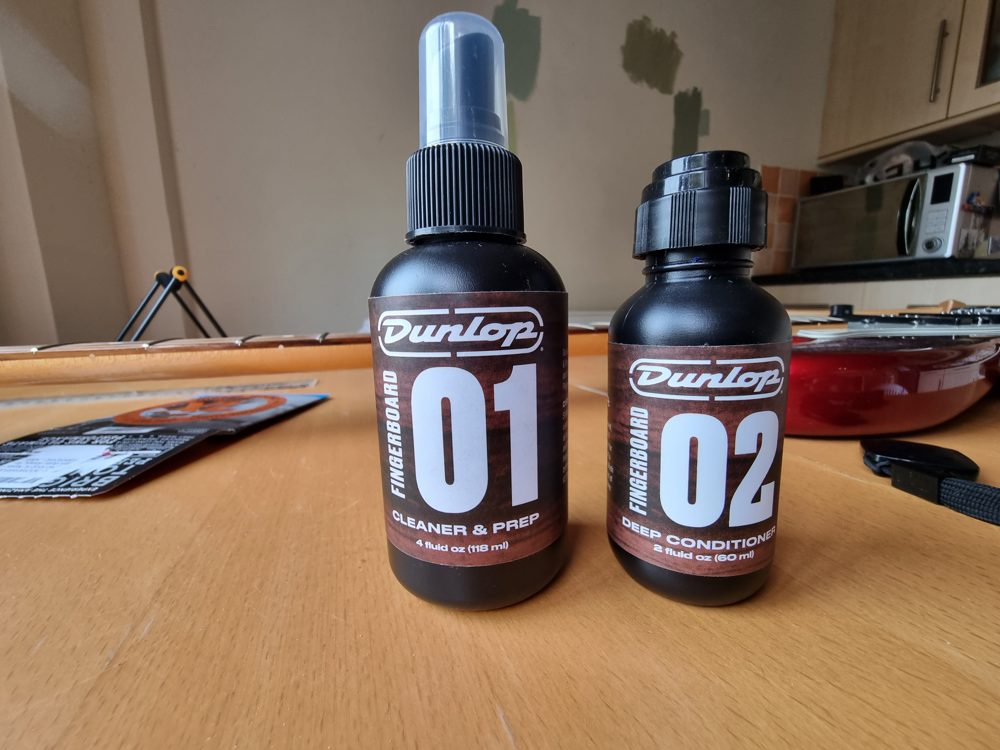
IMPORTANT: DON’T USE ON A MAPLE OR LACQUERED FRETBOARD. ROSEWOOD AND EBONY ONLY.
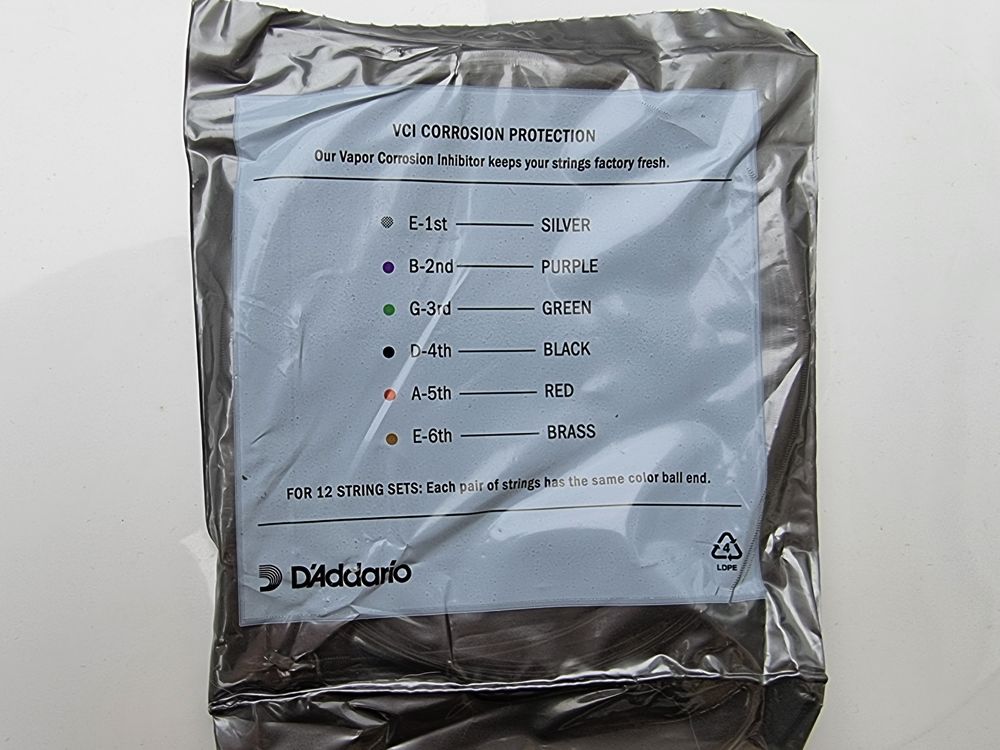
7. Grab your packet of new strings. For obvious reasons, it’s important to get the strings in the right order. Brands will differ here. Some, like D’Addario, color code the different strings to make identification a piece of cake. Others don’t however so you’ll need to check the string diameters.
It doesn’t really matter, but for the purpose of this article, start with the thick E string. That’ll be the largest number and the thickest string. The thin E string will be the smallest number.
8. We’re going to start at the bridge end. Take the ball end of the string and insert it into the appropriate hole behind the bridge. Important tip: kink the end of the string where the ball is slightly before you insert it into the hole. This will help with retention once you insert the pin and stop the pin from pulling out.
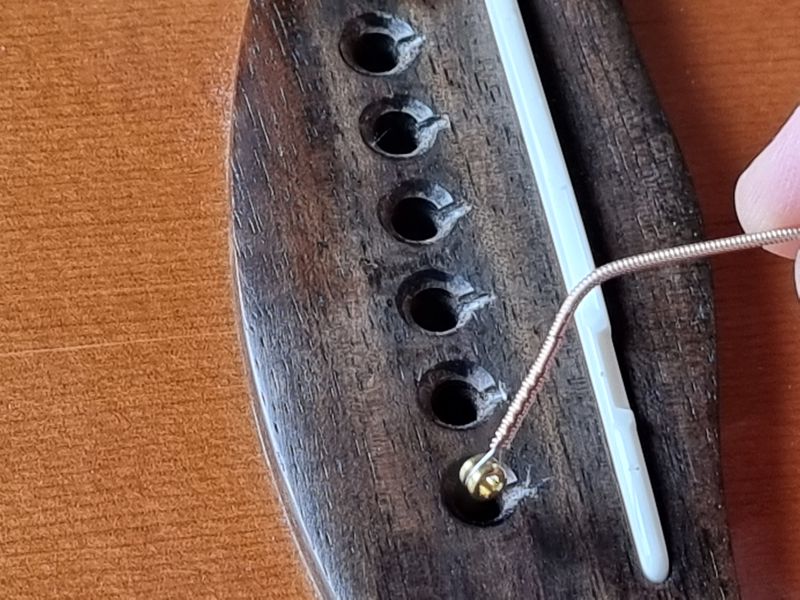
Insert the pin into the hole – with the groove in the pin facing up the neck towards the headstock – and push down on the head as far as it will go on top of the string, securing it in place. With your finger pressing down on top of the bridge pin head, pull the string until you feel it bottom out on the base of the pin. It should now be held securely in place.

Repeat for the other five strings (don’t forget to put a little kink down at the ball end of the string – it really helps with retention).
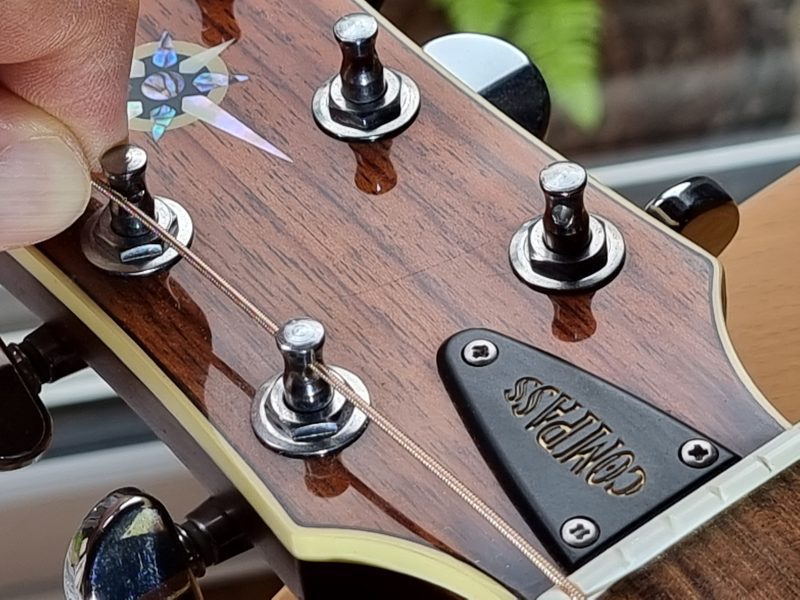
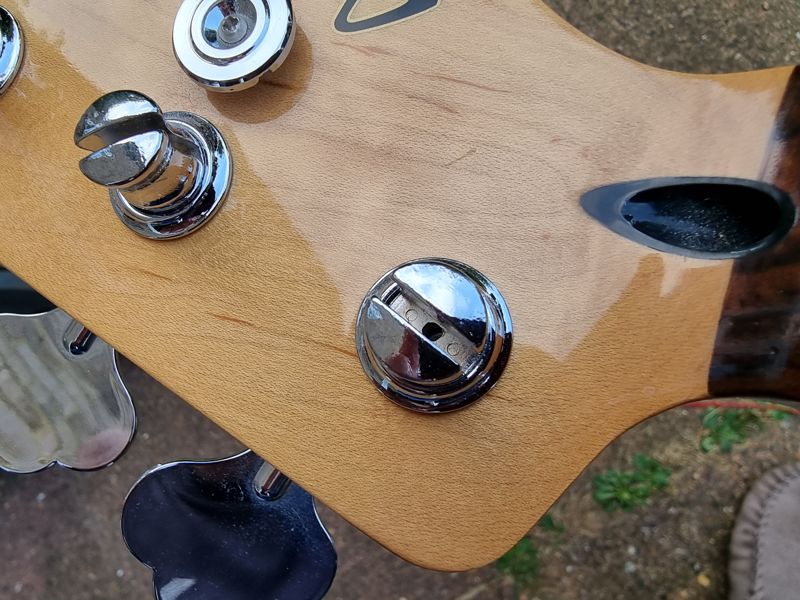
9. Now we’re going to move up to the headstock end. Let’s start with the thick E string. On most acoustic guitars, looking straight at the headstock front on, there will be three tuning pegs on the left and three on the right
The low E string will locate in the bottom left hand tuning peg. The A string will go directly above it center left and the D string top right above the A. The G string will go top right, the B centre right and finally the high E string bottom right.
10. Back to the thick E string. First make sure the hole in the tuning peg is pointing straight down the guitar neck. Grab the string, pass it through the first groove on the nut and then through the hole in the tuning peg. Pull it tight so there’s no slack.
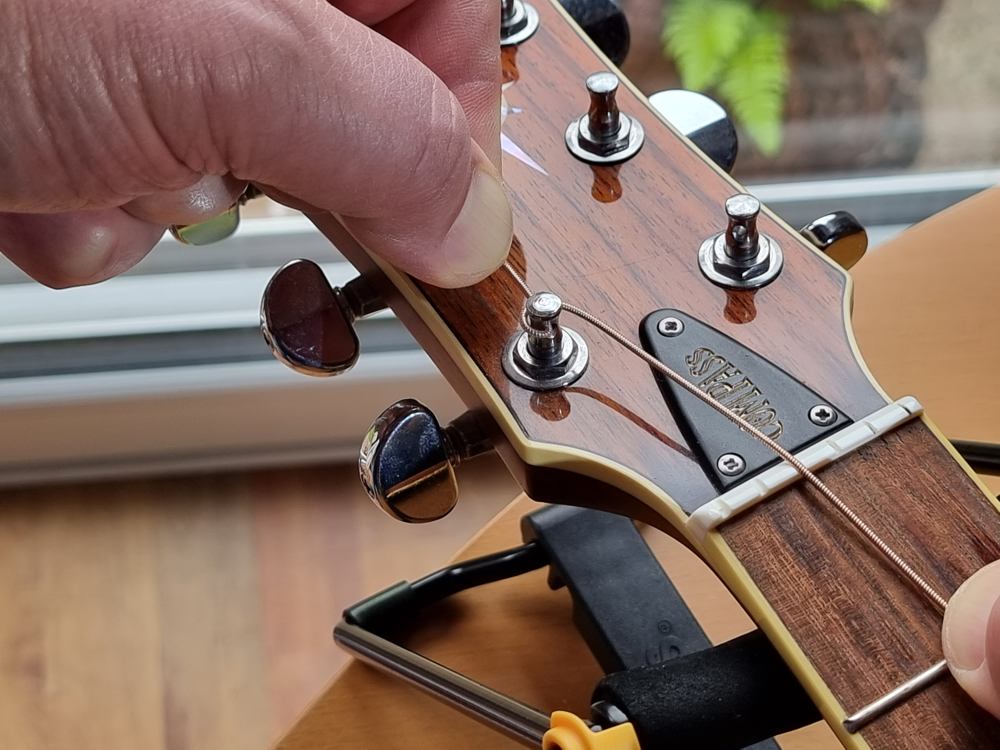
11. Now we’re going to introduce some slack so we can get some winds around the tuning peg to hold the string in position. So, pinch the string between thumb and forefinger at the second (A) tuning peg and grip it. Then pull the string downwards until the pinched string hits the first tuning peg. This will introduce some slack into the string. Keep the string pinched between thumb and forefinger
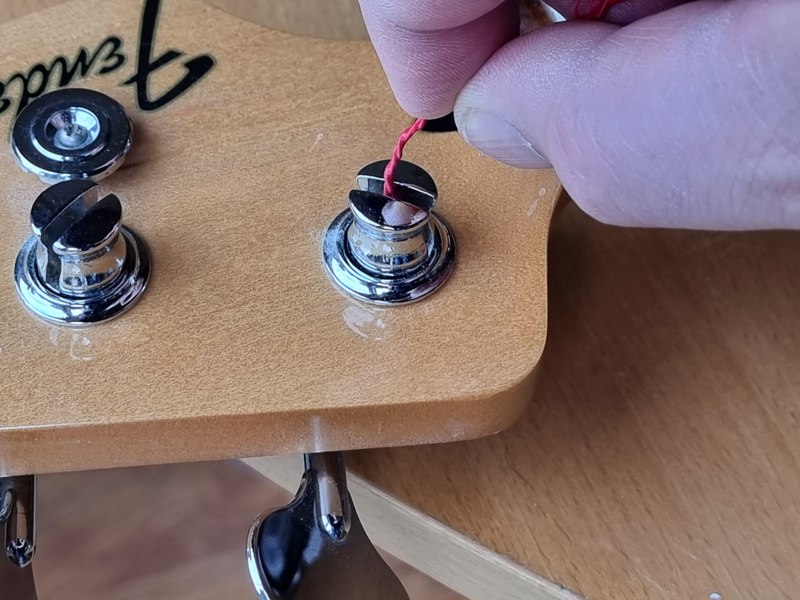
12. Next, and this is important, wrap the string in a clockwise direction around the top of the tuning peg so it’s over the top of the winding. Continue to hold the string and trap it between your forefinger and the headstock body to stop it moving.
13. Then using your peg winder start to wind counter-clockwise. The remainder of winding will go underneath the string. This is difficult to explain but what you’re left with is the first winding going ABOVE the string and the remaining windings going BELOW the string. See below.
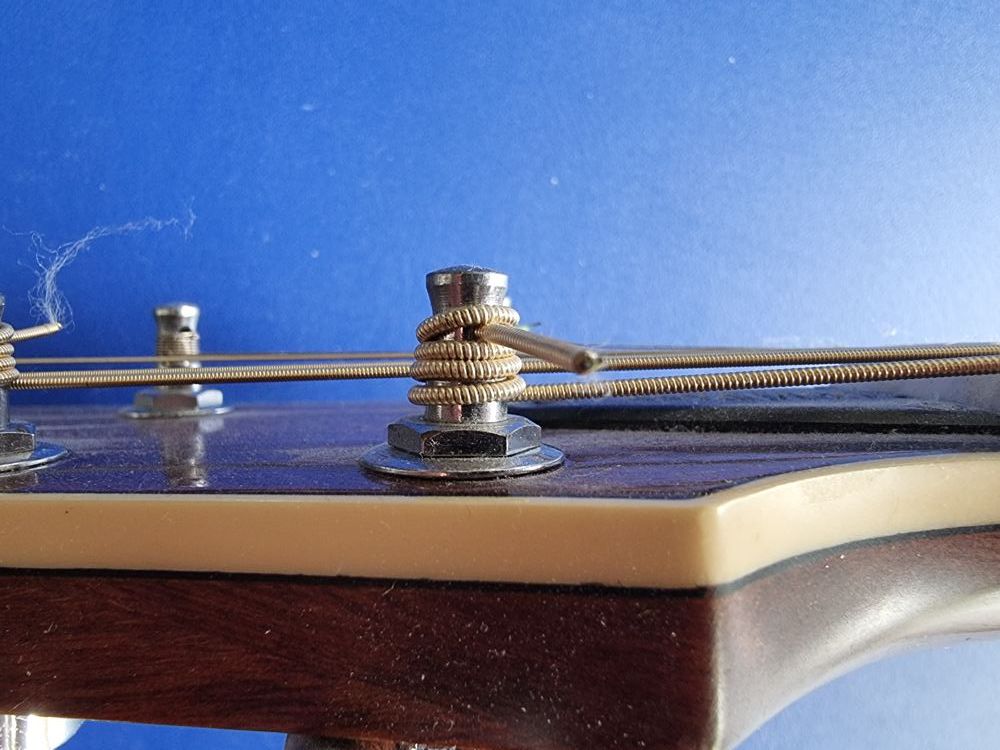
Not everyone does this. Some players just have all the windings going underneath the string hole. Doing it our way however the string gets ‘clamped’ between the upper and lower windings effectively trapping it. We’ve found that this really helps with keeping tuning stable.
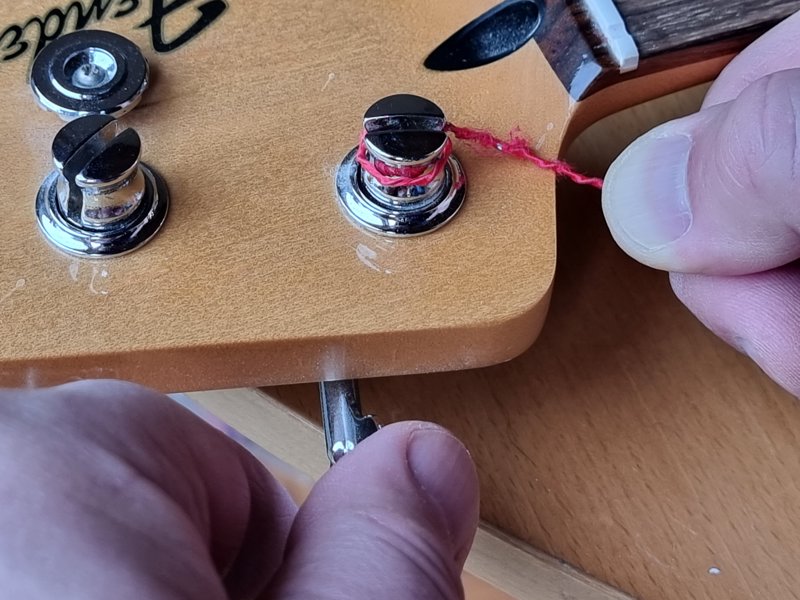
14. Do the same for all strings. Get them under tension but don’t worry about tuning at this point. Cut the excess off the strings pretty close to the tuning pegs. Not too close. Leave 5-10mm
Note: As you apply the thinner strings, you’ll need more slack so instead of just using the distance between two tuning pegs, apply a bit more because you’ll be able to do more winds. By the time you get to the thin E string, you’ll be using a two tuning peg gap
15. When you’re done, the strings should follow the same pattern on the INSIDE of the tuning pegs
16. Give the guitar a rough tune. You’ll actually be doing several tune-ups before it’s stable.
17. After the initial rough tune, stretch the strings. If you’re right handed grab the neck somewhere around the third fret with your left hand. With your right hand, somewhere around the 12th fret, grab the string you’re stretching and give it a good old pull a couple of times with a fair bit of force. Fret the string in different positions on the fretboard and stretch multiple times.
18. Repeat for the other strings and tune again. Rinse and repeat until the tuning is stable. You may need to stretch the strings three of four times.
19. Play the guitar a bit. Bash out some chords. Tuning will fluctuate for a while then stabilize.
Electric Guitars
Naturally, there are similarities between restringing electric and acoustic guitars, but there are differences too.
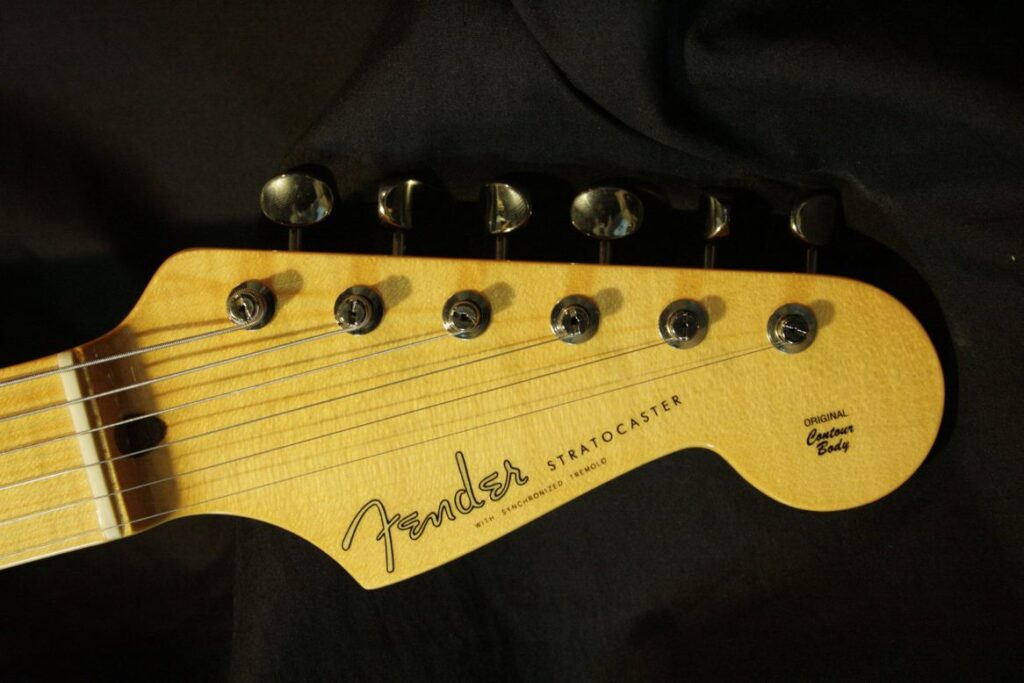
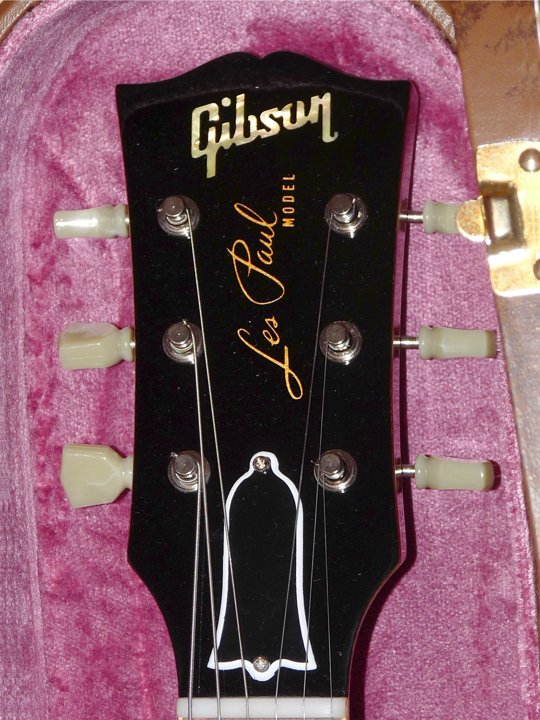
The main difference will be in the type of guitar you have. There are two main variants: Gibson and Fender styles.
Cosmetically, you’ll notice the difference straightaway. Fender tuning pegs are arranged in a single row on the headstock whereas Gibson style guitars have a ‘three each side’ arrangement.
The other major difference is the bridge. Gibson-esque guitars use a tune-o-matic style bridge. This means the string ball locates at the back of the tailpiece. On Fender style guitars, the string is passed up through a hole in the underside of the body.
Other than that, the restringing process is practically the same.
1. Remove the old strings. As before, to avoid the strings thrashing about like an angry pit viper when you snip them, slacken them off first. Then cut the strings, one by one somewhere around the center of the fretboard.
On Gibson style guitars, unless you want to condition the neck with lemon drops or similar, we recommend changing one string at a time. This ensures there’s always tension present to ensure the tune-o-matic bridge and tailpiece stay in place.
On Fender style guitars it’s up to you. Again if you want to deep clean or condition the neck, you’ll get better access if you remove all the strings.
2. OK, time to fit the new strings. Depending on what guitar you have, you’ll see different arrangements at the bridge end. The string ball may anchor on the back of the bridge itself or, as in this case with this Fender Strat, the string feeds through the appropriate hole in the back of the body.
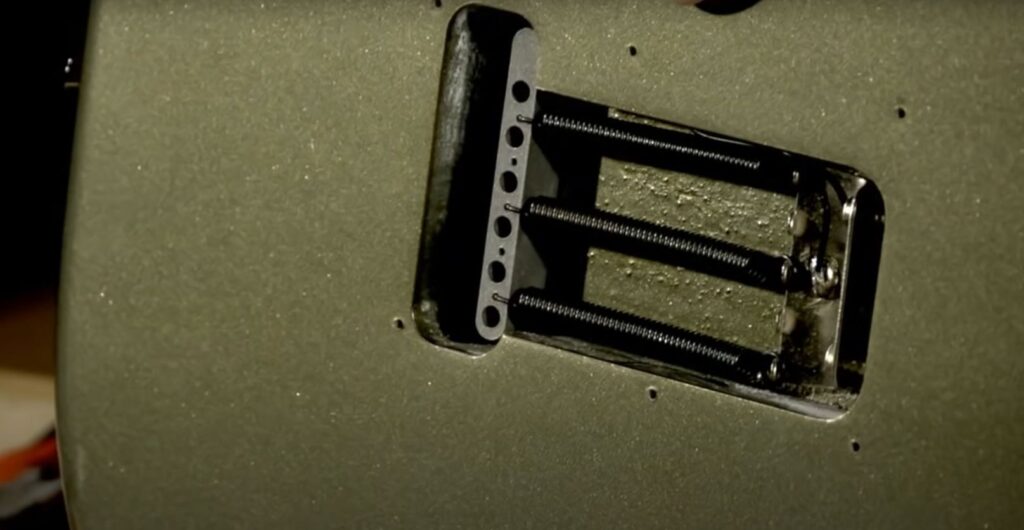
Insert the string (non-ball end) through the back of the guitar until it pokes through the other side. Pull all the slack through until the ball bottoms out, Repeat for all six strings.
3. Now it’s time to wind the strings onto the tuning pegs. Now again you may see some variation here. Machine heads could be modern style or classic/vintage. The main difference here is the position of the hole where you pass the string.
On modern pegs, the hole (and the string) will go through the peg; with classic, there will be a slot in the top of the machine head and a hole in the bottom
The principle is the same: on modern pegs, pass the string through the hole. With classic, insert the string into the hole in the bottom of the peg and wind the string around the peg. Same concept; slightly different arrangement. For this example, we’ll assume the guitar is a Fender Strat style with modern tuning pegs.
4. Now we need to cut the string to length. Pull the string up the neck to the appropriate machine head. Then, go two pegs past and cut. So if you’re fitting the low E string on a Strat style guitar, cut the string at the D machine head. Now pull the string back to the E machine head ready to wind.
5. As with the acoustic guitar set up earlier, we favor making the first wind ABOVE the string winding and the subsequent winds below. This pinches the string and makes it rock solid. See the photo from the acoustic example above to explain how this works. Using the peg winder (or good old fashioned fingers, complete the winding.
6. Rinse and repeat for the other strings. Remember when you’re finished, the strings should be wound on the inside of the tuning pegs. This applies to Gibson and Fender style guitars.
7. Once all the strings are in place, give ‘em a good stretch as with the acoustic example until they settle down. Finally, tune!
Bass Guitars
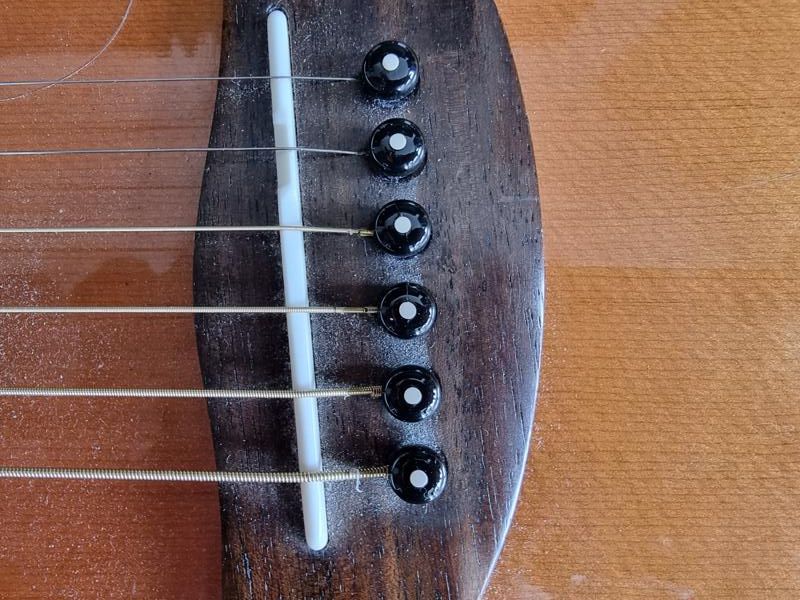
In principle, bass guitars follow the same process. The photo below is the tailstock of a Fender Jazz bass and we can see how the string ball ends locate against the rear of the bridge.
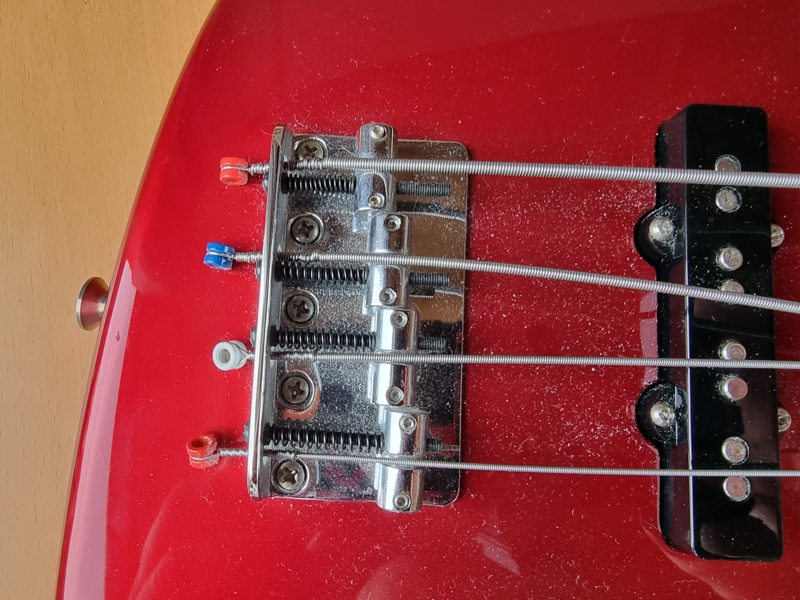
For convenience, these Rotosound Swing bass Rotosound stainless steel roundwounds are color coded.

1. After feeding the string through the hole in the bridge tailpiece and location the ball end, pull the string up towards the headstock. On a Fender Jazz bass, this is what the tuning pegs look like. Note the hole at the base of the peg below. This is where the string goes.
2. Now we’re going to cut the string to length. On bass guitars, we recommend going 4 inches past the tuning peg. Then snip.
3. Next, insert the string into the hole until it bottoms out.
4. Then wrap the string around the peg. Note that the strings go INSIDE the peg.
5. Finally, repeat for the other strings.